本文摘自php中文网,作者不言,侵删。
这篇文章主要介绍了关于pytorch + visdom CNN处理自建图片数据集的方法,有着一定的参考价值,现在分享给大家,有需要的朋友可以参考一下环境
系统:win10
cpu:i7-6700HQ
gpu:gtx965m
python : 3.6
pytorch :0.3
数据下载
来源自Sasank Chilamkurthy 的教程; 数据:下载链接。
下载后解压放到项目根目录:
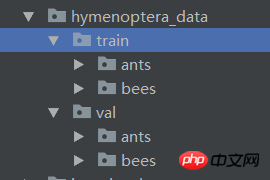
数据集为用来分类 蚂蚁和蜜蜂。有大约120个训练图像,每个类有75个验证图像。
数据导入
可以使用 torchvision.datasets.ImageFolder(root,transforms) 模块 可以将 图片转换为 tensor。
先定义transform:
1 2 3 4 5 6 7 8 9 10 11 12 13 14 15 16 17 18 19 | ata_transforms = {
'train': transforms.Compose([
transforms.RandomResizedCrop(224),
transforms.RandomHorizontalFlip(),
transforms.ToTensor(),
transforms.Normalize(mean=[0.485, 0.456, 0.406], std=[0.229, 0.224, 0.225])
]),
"val" : transforms.Compose([
transforms.Resize(256),
transforms.CenterCrop(224),
transforms.ToTensor(),
transforms.Normalize(mean=[0.485, 0.456, 0.406], std=[0.229, 0.224, 0.225])
])
}
|
导入,加载数据:
1 2 3 4 5 6 7 8 9 | data_dir = './hymenoptera_data'
image_datasets = {x: datasets.ImageFolder(os.path.join(data_dir, x), data_transforms[x]) for x in ['train', 'val']}
data_loaders = {x: DataLoader(image_datasets[x], batch_size=BATCH_SIZE, shuffle=True) for x in ['train', 'val']}
data_sizes = {x: len(image_datasets[x]) for x in ['train', 'val']}
class_names = image_datasets['train'].classes
print(data_sizes, class_names)
|
1 | {'train': 244, 'val': 153} ['ants', 'bees']
|
训练集 244图片 , 测试集153图片 。
可视化部分图片看看,由于visdom支持tensor输入 ,不用换成numpy,直接用tensor计算即可 :
1 2 3 4 5 6 7 8 | inputs, classes = next(iter(data_loaders['val']))
out = torchvision.utils.make_grid(inputs)
inp = torch.transpose(out, 0, 2)
mean = torch.FloatTensor([0.485, 0.456, 0.406])
std = torch.FloatTensor([0.229, 0.224, 0.225])
inp = std * inp + mean
inp = torch.transpose(inp, 0, 2)
viz.images(inp)
|

创建CNN
net 根据上一篇的处理cifar10的改了一下规格:
1 2 3 4 5 6 7 8 9 10 11 12 13 14 15 16 17 18 19 20 21 22 23 24 25 26 27 28 29 30 31 32 33 34 35 36 37 38 | class CNN(nn.Module):
def __init__(self, in_dim, n_class):
super(CNN, self).__init__()
self.cnn = nn.Sequential(
nn.BatchNorm2d(in_dim),
nn.ReLU(True),
nn.Conv2d(in_dim, 16, 7),
nn.BatchNorm2d(16),
nn.ReLU(inplace=True),
nn.MaxPool2d(2, 2),
nn.ReLU(True),
nn.Conv2d(16, 32, 5),
nn.BatchNorm2d(32),
nn.ReLU(True),
nn.Conv2d(32, 64, 5),
nn.BatchNorm2d(64),
nn.ReLU(True),
nn.Conv2d(64, 64, 3, 1, 1),
nn.BatchNorm2d(64),
nn.ReLU(True),
nn.MaxPool2d(2, 2),
nn.Conv2d(64, 128, 3, 1, 1),
nn.BatchNorm2d(128),
nn.ReLU(True),
nn.MaxPool2d(3),
)
self.fc = nn.Sequential(
nn.Linear(128*16*16, 120),
nn.BatchNorm1d(120),
nn.ReLU(True),
nn.Linear(120, n_class))
def forward(self, x):
out = self.cnn(x)
out = self.fc(out.view(-1, 128*16*16))
return out
model = CNN(3, 2)
|
loss,优化函数:
1 2 3 4 | line = viz.line(Y=np.arange(10))
loss_f = nn.CrossEntropyLoss()
optimizer = optim.SGD(model.parameters(), lr=LR, momentum=0.9)
scheduler = optim.lr_scheduler.StepLR(optimizer, step_size=7, gamma=0.1)
|
参数:
1 2 3 | BATCH_SIZE = 4
LR = 0.001
EPOCHS = 10
|
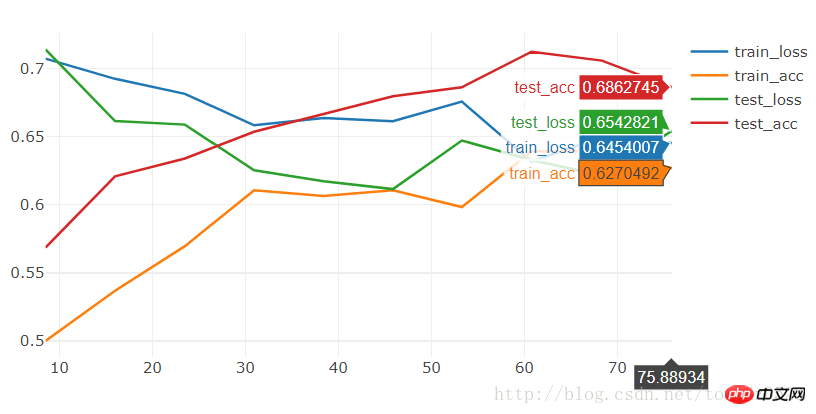
运行 10个 epoch 看看:
1 2 3 4 | [9/10] train_loss:0.650|train_acc:0.639|test_loss:0.621|test_acc0.706
[10/10] train_loss:0.645|train_acc:0.627|test_loss:0.654|test_acc0.686
Training complete in 1m 16s
Best val Acc: 0.712418
|
运行 20个看看:
1 2 3 4 | [19/20] train_loss:0.592|train_acc:0.701|test_loss:0.563|test_acc0.712
[20/20] train_loss:0.564|train_acc:0.721|test_loss:0.571|test_acc0.706
Training complete in 2m 30s
Best val Acc: 0.745098
|
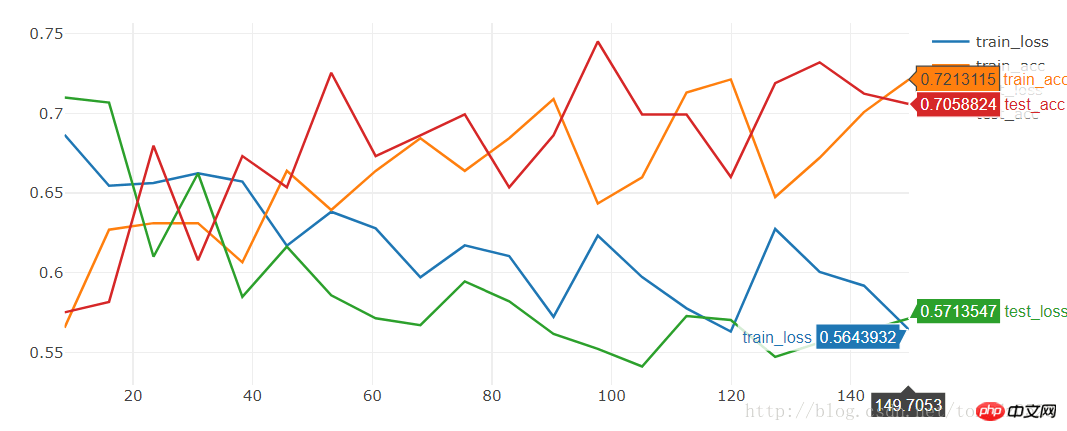
准确率比较低:只有74.5%
我们使用models 里的 resnet18 运行 10个epoch:
1 2 3 | model = torchvision.models.resnet18(True)
num_ftrs = model.fc.in_features
model.fc = nn.Linear(num_ftrs, 2)
|
1 2 3 4 | [9/10] train_loss:0.621|train_acc:0.652|test_loss:0.588|test_acc0.667
[10/10] train_loss:0.610|train_acc:0.680|test_loss:0.561|test_acc0.667
Training complete in 1m 24s
Best val Acc: 0.686275
|
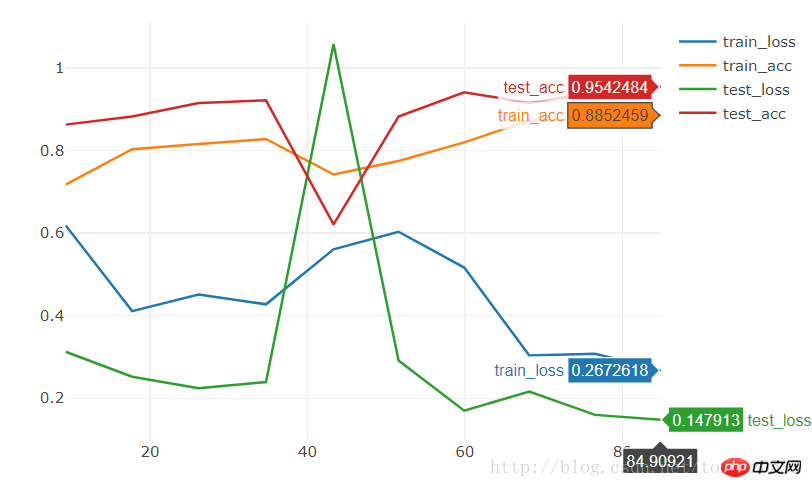
效果也很一般,想要短时间内就训练出效果很好的models,我们可以下载训练好的state,在此基础上训练:
1 2 3 | model = torchvision.models.resnet18(pretrained=True)
num_ftrs = model.fc.in_features
model.fc = nn.Linear(num_ftrs, 2)
|
1 2 3 4 | [9/10] train_loss:0.308|train_acc:0.877|test_loss:0.160|test_acc0.941
[10/10] train_loss:0.267|train_acc:0.885|test_loss:0.148|test_acc0.954
Training complete in 1m 25s
Best val Acc: 0.954248
|
10个epoch直接的到95%的准确率。
相关推荐:
pytorch
+ visdom 处理简单分类问题
以上就是pytorch + visdom CNN处理自建图片数据集的方法的详细内容,更多文章请关注木庄网络博客!!
相关阅读 >>
Python中numpy的属性与创建矩阵
Python中的eval函数是什么
Python里int什么意思
如何成为Python全栈工程师
如何离开/退出/停用Python的virtualenv
django框架入门使用1.0
pandas技巧之 dataframe中的排序与汇总方法
pyhton列表转换为数组案列讲解
Python中常见工厂函数用法详解
运行Python脚本的方法是什么
更多相关阅读请进入《Python》频道 >>

人民邮电出版社
python入门书籍,非常畅销,超高好评,python官方公认好书。
转载请注明出处:木庄网络博客 » pytorch + visdom CNN处理自建图片数据集的方法


