本文摘自php中文网,作者巴扎黑,侵删。
Beautifulsoup和selenium的简单使用
requests库的复习
好久没用requests了,因为一会儿要写个简单的爬虫,所以还是随便写一点复习下。
import requests

r = requests.get('https://api.github.com/user', auth=('haiyu19931121@163.com', 'Shy18137803170'))print(r.status_code) # 状态码200print(r.json()) # 返回json格式print(r.text) # 返回文本print(r.headers) # 头信息print(r.encoding) # 编码方式,一般utf-8# 当写入文件比较大时,避免内存耗尽,可以一次写指定的字节数或者一行。# 一次读一行,chunk_size=512为默认值for chunk in r.iter_lines():print(chunk)# 一次读取一块,大小为512for chunk in r.iter_content(chunk_size=512):print(chunk)注意iter_lines和iter_content返回的都是字节数据,若要写入文件,不管是文本还是图片,都需要以wb的方式打开。
Beautifulsoup的使用
进入正题,早就听说这个著名的库,以前写爬虫用正则表达式虽然不麻烦,但有时候会匹配不准确。使用Beautifulsoup可以准确从HTML标签中提取数据。虽然是慢了点,但是简单好使呀。
from bs4 import BeautifulSoup

html_doc = """<html><head><title>The Dormouse's story</title></head><body><p class="title"><b>The Dormouse's story</b></p><p class="story">Once upon a time there were three little sisters; and their names were<a href="http://example.com/elsie" class="sister" id="link1">Elsie</a>,<a href="http://example.com/lacie" class="sister" id="link2">Lacie</a> and<a href="http://example.com/tillie" class="sister" id="link3">Tillie</a>;and they lived at the bottom of a well.</p><p class="story">...</p>"""# 就注意一点,第二个参数指定解析器,必须填上,不然会有警告。推荐使用lxmlsoup = BeautifulSoup(html_doc, 'lxml')
紧接着上面的代码,看下面一些简单的操作。使用点属性的行为,会得到第一个查找到的符合条件的数据。是find方法的简写。
soup.a
soup.find('p')
上面的两句是等价的。
# soup.body是一个Tag对象。是body标签中所有html代码print(soup.body)
1 2 3 4 5 6 7 8 9 |
|
# 获取body里所有文本,不含标签print(soup.body.text)# 等同于下面的写法soup.body.get_text()# 还可以这样写,strings是所有文本的生成器for string in soup.body.strings:print(string, end='')
1 2 3 4 5 6 7 |
|
# 获得该标签里的文本。print(soup.title.string)
1 |
|
# Tag对象的get方法可以根据属性的名称获得属性的值,此句表示得到第一个p标签里class属性的值print(soup.p.get('class'))# 和下面的写法等同print(soup.p['class'])1 |
|
# 查看a标签的所有属性,以字典形式给出print(soup.a.attrs)
1 |
|
# 标签的名称soup.title.name
1 |
|
find_all
使用最多的当属find_all / find方法了吧,前者查找所有符合条件的数据,返回一个列表。后者则是这个列表中的第一个数据。find_all有一个limit参数,限制列表的长度(即查找符合条件的数据的个数)。当limit=1其实就成了find方法 。
find_all同样有简写方法。
soup.find_all('a', id='link1')
soup('a', id='link1')
上面两种写法是等价的,第二种写法便是简写。
1 2 |
|
name
name就是想要搜索的标签,比如下面就是找到所有的p标签。不仅能填入字符串,还能传入正则表达式、列表、函数、True。
# 传入字符串soup.find_all('p')# 传入正则表达式import re# 必须以b开头for tag in soup.find_all(re.compile("^b")):print(tag.name)# body# b# 含有t就行for tag in soup.find_all(re.compile("t")):print(tag.name)# html# title# 传入列表表示,一次查找多个标签soup.find_all(["a", "b"])# [<b>The Dormouse's story</b>,# <a class="sister" href="http://example.com/elsie" id="link1">Elsie</a>,# <a class="sister" href="http://example.com/lacie" id="link2">Lacie</a>,# <a class="sister" href="http://example.com/tillie" id="link3">Tillie</a>]传入True的话,就没有限制,什么都查找了。
recursive
调用tag的 find_all() 方法时,Beautiful Soup会检索当前tag的所有子孙节点,如果只想搜索tag的直接子节点,可以使用参数 recursive=False 。
# title不是html的直接子节点,但是会检索其下所有子孙节点soup.html.find_all("title")# [<title>The Dormouse's story</title>]# 参数设置为False,只会找直接子节点soup.html.find_all("title", recursive=False)# []# title就是head的直接子节点,所以这个参数此时无影响a = soup.head.find_all("title", recursive=False)# [<title name="good">The Dormouse's story</title>]keyword和attrs
使用keyword,加上一个或者多个限定条件,缩小查找范围。
# 查看所有id为link1的p标签soup.find_all('a', id='link1')如果按类查找,由于class关键字Python已经使用。可以用class_,或者不指定关键字,又或者使用attrs填入字典。
soup.find_all('p', class_='story')
soup.find_all('p', 'story')
soup.find_all('p', attrs={"class": "story"})上面三种方法等价。class_可以接受字符串、正则表达式、函数、True。
text
搜索文本值,好像使用string参数也是一样的结果。
a = soup.find_all(text='Elsie')# 或者,4.4以上版本请使用texta = soup.find_all(string='Elsie')
text参数也可以接受字符串、正则表达式、True、列表。
CSS选择器
还能使用CSS选择器呢。使用select方法就好了,select始终返回一个列表。
列举几个常用的操作。
# 所有div标签soup.select('div')# 所有id为username的元素soup.select('.username')# 所有class为story的元素soup.select('#story')# 所有div元素之内的span元素,中间可以有其他元素soup.select('div span')# 所有div元素之内的span元素,中间没有其他元素soup.select('div > span')# 所有具有一个id属性的input标签,id的值无所谓soup.select('input[id]')# 所有具有一个id属性且值为user的input标签soup.select('input[id="user"]')# 搜索多个,class为link1或者link2的元素都符合soup.select("#link1, #link2")一个爬虫小例子
上面介绍了requests和beautifulsoup4的基本用法,使用这些已经可以写一些简单的爬虫了。来试试吧。
此例子来自《Python编程快速上手——让繁琐的工作自动化》[美] AI Sweigart
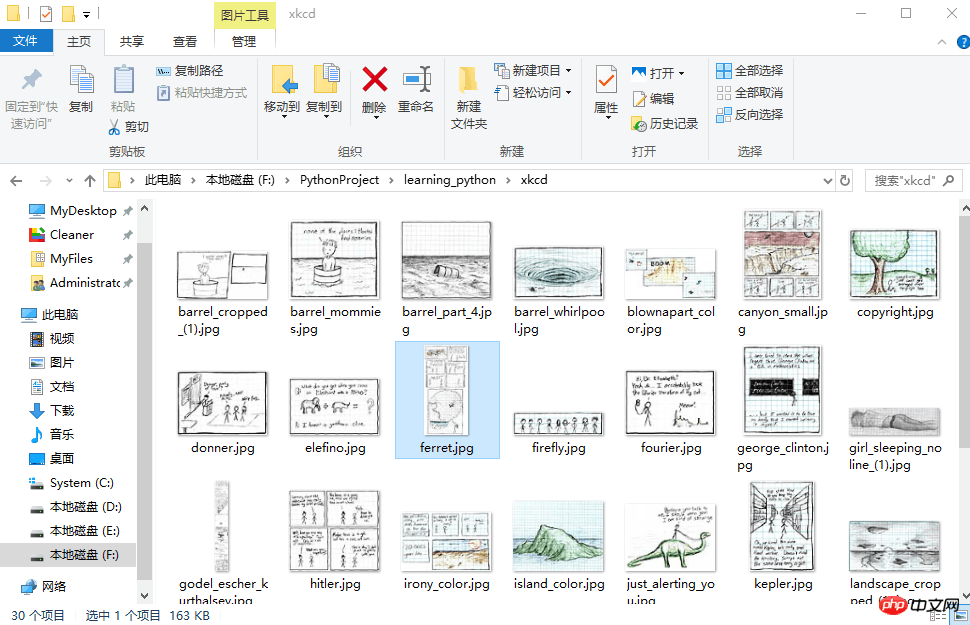
这个爬虫会批量下载XKCD漫画网的图片,可以指定下载的页面数。
import osimport requestsfrom bs4 import BeautifulSoup# exist_ok=True,若文件夹已经存在也不会报错os.makedirs('xkcd')
url = 'https://xkcd.com/'headers = {'User-Agent': 'Mozilla/5.0 (Windows NT 10.0; Win64; x64) AppleWebKit/537.36 (KHTML, like Gecko) '  'Chrome/57.0.2987.98 Safari/537.36'}def save_img(img_url, limit=1):
    r = requests.get(img_url, headers=headers)
    soup = BeautifulSoup(r.text, 'lxml')try:
        img = 'https:' + soup.find('div', id='comic').img.get('src')except AttributeError:print('Image Not Found')else:print('Downloading', img)
        response = requests.get(img, headers=headers)with open(os.path.join('xkcd', os.path.basename(img)), 'wb') as f:for chunk in response.iter_content(chunk_size=1024*1024):
                f.write(chunk)# 每次下载一张图片,就减1limit -= 1# 找到上一张图片的网址if limit > 0:try:
            prev = 'https://xkcd.com' + soup.find('a', rel='prev').get('href')except AttributeError:print('Link Not Exist')else:
            save_img(prev, limit)if __name__ == '__main__':
    save_img(url, limit=20)print('Done!')
1 2 3 4 5 6 7 8 9 10 11 |
|
多线程下载
单线程的速度有点慢,比如可以使用多线程,由于我们在获取prev的时候,知道了每个网页的网址是很有规律的。它像这样。只是最后的数字不一样,所以我们可以很方便地使用range来遍历。
import osimport threadingimport requestsfrom bs4 import BeautifulSoup

os.makedirs('xkcd')

headers = {'User-Agent': 'Mozilla/5.0 (Windows NT 10.0; Win64; x64) AppleWebKit/537.36 (KHTML, like Gecko) '  'Chrome/57.0.2987.98 Safari/537.36'}def download_imgs(start, end):for url_num in range(start, end):
        img_url = 'https://xkcd.com/' + str(url_num)
        r = requests.get(img_url, headers=headers)
        soup = BeautifulSoup(r.text, 'lxml')try:
            img = 'https:' + soup.find('div', id='comic').img.get('src')except AttributeError:print('Image Not Found')else:print('Downloading', img)
            response = requests.get(img, headers=headers)with open(os.path.join('xkcd', os.path.basename(img)), 'wb') as f:for chunk in response.iter_content(chunk_size=1024 * 1024):
                    f.write(chunk)if __name__ == '__main__':# 下载从1到30,每个线程下载10个threads = []for i in range(1, 30, 10):
        thread_obj = threading.Thread(target=download_imgs, args=(i, i + 10))
        threads.append(thread_obj)
        thread_obj.start()# 阻塞,等待线程执行结束都会等待for thread in threads:
        thread.join()# 所有线程下载完毕,才打印print('Done!')
来看下结果吧。
初步了解selenium
selenium用来作自动化测试。使用前需要下载驱动,我只下载了Firefox和Chrome的。网上随便一搜就能下载到了。接下来将下载下来的文件其复制到将安装目录下,比如Firefox,将对应的驱动程序放到C:\Program Files (x86)\Mozilla Firefox,并将这个路径添加到环境变量中,同理Chrome的驱动程序放到C:\Program Files (x86)\Google\Chrome\Application并将该路径添加到环境变量。最后重启IDE开始使用吧。
模拟百度搜索
下面这个例子会打开Chrome浏览器,访问百度首页,模拟输入The Zen of Python,随后点击百度一下,当然也可以用回车代替。Keys下是一些不能用字符串表示的键,比如方向键、Tab、Enter、Esc、F1~F12、Backspace等。然后等待3秒,页面跳转到知乎首页,接着返回到百度,最后退出(关闭)浏览器。
from selenium import webdriverfrom selenium.webdriver.common.keys import Keysimport time

browser = webdriver.Chrome()# Chrome打开百度首页browser.get('https://www.baidu.com/')# 找到输入区域input_area = browser.find_element_by_id('kw')# 区域内填写内容input_area.send_keys('The Zen of Python')# 找到"百度一下"search = browser.find_element_by_id('su')# 点击search.click()# 或者按下回车# input_area.send_keys('The Zen of Python', Keys.ENTER)time.sleep(3)
browser.get('https://www.zhihu.com/')
time.sleep(2)# 返回到百度搜索browser.back()
time.sleep(2)# 退出浏览器browser.quit()
send_keys模拟输入内容。可以使用element的clear()方法清空输入。一些其他模拟点击浏览器按钮的方法如下
browser.back() # 返回按钮browser.forward() # 前进按钮browser.refresh() # 刷新按钮browser.close() # 关闭当前窗口browser.quit() # 退出浏览器
查找方法
以下列举常用的查找Element的方法。
| 方法名 | 返回的WebElement |
|---|---|
| find_element_by_id(id) | 匹配id属性值的元素 |
| find_element_by_name(name) | 匹配name属性值的元素 |
| find_element_by_class_name(name) | 匹配CSS的class值的元素 |
| find_element_by_tag_name(tag) | 匹配标签名的元素,如div |
| find_element_by_css_selector(selector) | 匹配CSS选择器 |
| find_element_by_xpath(xpath) | 匹配xpath |
| find_element_by_link_text(text) | 完全匹配提供的text的a标签 |
| find_element_by_partial_link_text(text) | 提供的text可以是a标签中文本中的一部分 |
登录CSDN
以下代码可以模拟输入账号密码,点击登录。整个过程还是很快的。
browser = webdriver.Chrome()
browser.get('https://passport.csdn.net/account/login')
browser.find_element_by_id('username').send_keys('haiyu19931121@163.com')
browser.find_element_by_id('password').send_keys('**********')
browser.find_element_by_class_name('logging').click()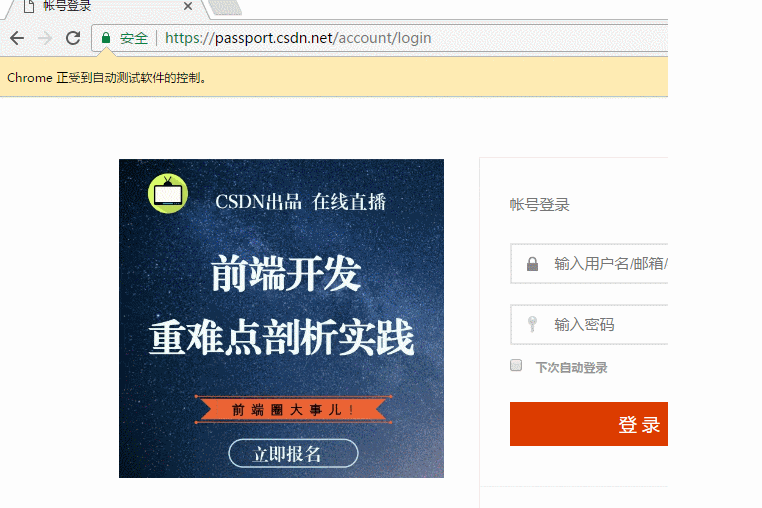
以上差不多都是API的罗列,其中有自己的理解,也有照搬官方文档的。
by @sunhaiyu
2017.7.13
以上就是对Beautifulsoup和selenium用法的简单介绍的详细内容,更多文章请关注木庄网络博客!!
相关阅读 >>
更多相关阅读请进入《Python》频道 >>

Python编程 从入门到实践 第2版
python入门书籍,非常畅销,超高好评,python官方公认好书。


