# -*- coding:utf-8 -*-
author = 'kingking'
version = '1.0'
date = '14/07/2017'
import cv2
import numpy as np
import time
if name == 'main':
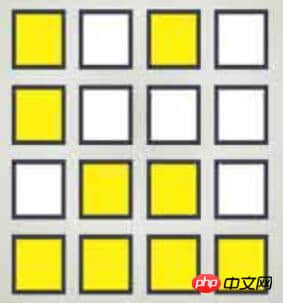
Img = cv2.imread('example.png')#读入一幅图像
kernel_2 = np.ones((2,2),np.uint8)#2x2的卷积核
kernel_3 = np.ones((3,3),np.uint8)#3x3的卷积核
kernel_4 = np.ones((4,4),np.uint8)#4x4的卷积核
if Img is not None:#判断图片是否读入
HSV = cv2.cvtColor(Img, cv2.COLOR_BGR2HSV)#把BGR图像转换为HSV格式
'''
HSV模型中颜色的参数分别是:色调(H),饱和度(S),明度(V)
下面两个值是要识别的颜色范围
'''
Lower = np.array([20, 20, 20])#要识别颜色的下限
Upper = np.array([30, 255, 255])#要识别的颜色的上限
#mask是把HSV图片中在颜色范围内的区域变成白色,其他区域变成黑色
mask = cv2.inRange(HSV, Lower, Upper)
#下面四行是用卷积进行滤波
erosion = cv2.erode(mask,kernel_4,iterations = 1)
erosion = cv2.erode(erosion,kernel_4,iterations = 1)
dilation = cv2.dilate(erosion,kernel_4,iterations = 1)
dilation = cv2.dilate(dilation,kernel_4,iterations = 1)
#target是把原图中的非目标颜色区域去掉剩下的图像
target = cv2.bitwise_and(Img, Img, mask=dilation)
#将滤波后的图像变成二值图像放在binary中
ret, binary = cv2.threshold(dilation,127,255,cv2.THRESH_BINARY)
#在binary中发现轮廓,轮廓按照面积从小到大排列
contours, hierarchy = cv2.findContours(binary,cv2.RETR_EXTERNAL,cv2.CHAIN_APPROX_SIMPLE)
p=0
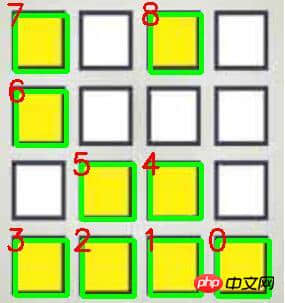
for i in contours:#遍历所有的轮廓
x,y,w,h = cv2.boundingRect(i)#将轮廓分解为识别对象的左上角坐标和宽、高
#在图像上画上矩形(图片、左上角坐标、右下角坐标、颜色、线条宽度)
cv2.rectangle(Img,(x,y),(x+w,y+h),(0,255,),3)
#给识别对象写上标号
font=cv2.FONT_HERSHEY_SIMPLEX
cv2.putText(Img,str(p),(x-10,y+10), font, 1,(0,0,255),2)#加减10是调整字符位置
p +=1
print '黄色方块的数量是',p,'个'#终端输出目标数量
cv2.imshow('target', target)
cv2.imshow('Mask', mask)
cv2.imshow("prod", dilation)
cv2.imshow('Img', Img)
cv2.imwrite('Img.png', Img)#将画上矩形的图形保存到当前目录
while True:
Key = chr(cv2.waitKey(15) & 255)
if Key == 'q':
cv2.destroyAllWindows()
break